


A WordPress Tutorial for Beginners: Create Your First Site in 10 Steps
The first time you step foot inside the WordPress dashboard, you can’t help but marvel at how simple it all appears to be. A management sidebar on the left. A clean interface to work within in the center. Notifications at the top.

The WordPress Dashboard screen…a blank canvas with infinite potential!
But once you start digging deeper into WordPress, you may feel overwhelmed as you dig deeper into the layers of functionality within the content management system.

There’s a lot to explore under the hood!
So, let’s talk practical steps here.
What do you need to do to get started in WordPress and end up with a website that’s ready to impress visitors straight out the gate? And how can you do this in the most efficient manner as possible, even without prior experience in WordPress? The following WordPress tutorial will walk you through all the necessary steps in setting up your first WordPress site.
- Step 1: Choose a Domain
- Step 2: Purchase Web Hosting and Domain
- Step 3: Install WordPress
- Step 4: Find a WordPress Theme
- Step 5: Install Your WordPress Theme
- Step 6: Configure Your WordPress Theme
- Step 7: Publish Your First Pages
- Step 8: Create a Menu
- Step 9: Configure Your WordPress Settings
- Step 10: Install Essential WordPress Plugins
WordPress Tutorial for Beginners: Step-by-Step
Before you even step inside WordPress, you need to do some work to find a home for it. So, let’s start with the steps you need to tackle outside of WordPress, and then move inside the platform once we have you all set up.
Step 1: Choose a Domain
This is a web domain:

The website address includes its domain name.
It will serve as the URL inside your visitors’ address bar when they visit your WordPress site. Make sure it is:
- Relatively short
- Easy to remember and type out
- Matches your brand name or is directly related to it
Unless you have already purchased a domain for your website, it’s best to do so when you purchase your web hosting plan (especially since some plans will include a free domain).
So long as no one has claimed the name before, you’ll have your choice of top-level domain (TLD) as well. A TLD is the suffix you attach to the URL like .com, .edu, .biz, etc. There are even ones available for specific industries as well as based on your geographic location (like .uk and .eu). Google has a pretty good roundup on the various TLDs you can choose from.
Step 2: Purchase Web Hosting and Domain
Web hosting does exactly what it says: it “hosts” websites. In other words, web hosting companies own and manage giant web servers located in data centers around the country (and, sometimes, the world).
It’s on these web servers where websites like yours sit, so you don’t have to buy or manage any of the server technology yourself. You pay these companies what amounts to a monthly or annual rent for space and bandwidth on the server. Then, you can focus on building your website in WordPress.
In terms of choosing a hosting plan, you should think about what you actually want to do with your website.
- Creating a small internal and private company site? WordPress.com hosting should be fine.
- Running a blog? Shared hosting is a good place to start.
- Launching a new business venture and want to collect leads and/or payments? Cloud hosting is a smart choice.
- If you anticipate heavy traffic for your established business or e-commerce company to start, then go with VPS.
Once you start receiving heavy traffic and are doing lots of business through your site, you may want to consider moving to managed WordPress hosting.
Whichever way you choose to go, you can’t go wrong with WPMU DEV hosting.
Even our affordable starter plan (Bronze) offers fully dedicated managed WordPress hosting with blazing-fast speeds, loads of storage, RAM, and bandwidth to help you grow, built-in state-of-the-art features, and 24/7 access to live chat support.

WPMU DEV Hosting is ideal for all your WordPress hosting needs.
Of course, you can choose other hosting providers to set up a WordPress site, but we are confident that you’ll find our hosting service hard to beat, especially when you see how we compare with other leading hosting providers.
Signing up for web hosting with WPMU DEV is easy–it’s like purchasing any other software or service.
You can purchase our hosting separately starting from just $10 per month, or if you are just starting out, become a member using our 7-day free trial and for just a few dollars more, get access to hosting…and everything we offer!
All you need to start with is a domain name. You don’t need anything else, like an SSL certificate to boost security, CDN, dedicated IP addresses, etc. as we supply all of that.
If you want hosting as part of your membership, then sign up here. Otherwise, if you’re purchasing hosting as a separate service, go to our hosting page and select a plan.

Choose a hosting plan.
Enter your details to set up your account and click next…

Add your details
Enter your payment information, click the Get started button, and you’re all good to go.
Step 3: Install WordPress
There are a number of ways to install WordPress. Most web hosting service will provide you with an easy-to-use one-click installation process that simplifies the whole process.
With WPMU DEV hosting, we make things even simpler by automatically installing and configuring WordPress for you when you create a new site (and we give you different options to create your site too!)
Let’s go through an example…
First, log into your WPMU DEV account and go to The Hub (our WordPress management console and your web hosting HQ):

Log into your account and go to The Hub.
The Hub lets you manage all of your WordPress sites (even if they’re not hosted with WPMU DEV).
To create a new WordPress site in The Hub, click on the (+) button

Click on the button to add a new website.
You’ll be presented with different options for adding a site, such as connecting an externally hosted site, migrating your site from another host, creating a brand new site from scratch or from a template, or cloning your site from an existing site.
For this example, select Create New…

Let’s create a new site.
You will be presented with The Hub’s site creation wizard. Let’s go through the steps…
First, select the type of site you would like to create. Let’s choose a brand new site.

Let’s create a brand new site from scratch.
Next, you will be asked to create a temporary website URL. Pick any name you like. This name will display as xxxx.tempurl.host (where xxxx is the name you choose). Tip: if you’re setting up multiple sites, use your domain as the prefix (e.g. ‘yourdomain.tempurl.host’).

Create a temporary URL for your new website.
Next, set up your WordPress admin account. This will be your site’s login details.

Set up your WordPress site admin account.
Last step, choose a server location where your site will be hosted. We currently have 10 data centers located around the world, so pick the one closest to where most of your visitors are located.

Choose your server location.
That’s it, your site will be installed with WordPress and your server configurations will be optimized…all this is automatically done in mere minutes.

Your new site will be automatically created in mere minutes.
Your WordPress site is now completely installed, set up and ready to go.
Note: The only step left to do is to connect your domain name with your new site in your hosting account. Once this is done, your domain name will replace the temporary website URL.
To complete this step, see our tutorial on how to configure your DNS and Nameservers.
Once you have completed the installation and created your WordPress login credentials, it’s time to step inside.
You can access your WordPress admin area easily via The Hub.
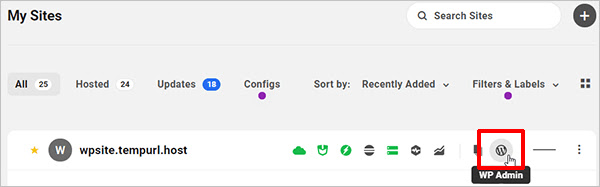
Access your WordPress admin area from The Hub.
Alternatively, you can log into your WordPress admin area from your web browser.
Here is what your admin login screen will look like:

The WordPress login screen.
Unless you change your login domain (which you eventually should for security reasons), your admin login will be located at www.yourdomainname.com/wp-login.php.
Step 4: Find a WordPress Theme
You may be tempted to start combing through the various settings and pages in the WordPress menu, but hold on that for now. The first thing you need to do here is to find a theme for your site.
A WordPress theme is a pre-designed and pre-coded interface template for WordPress. Basically, it saves you the trouble (and money) of having to design your own website from-scratch or to pay someone else to do it for you.
When you log into WordPress for the first time, WordPress will automatically assign their latest theme to your site.

The WordPress.org free theme directory contains thousands of free themes for WordPress.
There’s absolutely nothing wrong with using this theme, especially since it’s built by WordPress developers. However, it’s a very basic theme and one that’s not likely going to be useful if you want to do anything more than blog or create a simple site for a local business.

The Twenty Seventeen theme for WordPress.
If you want to use a WordPress theme that works better for your niche, don’t be afraid to look around and to find the best and most trustworthy WordPress theme for your purposes.
Keep in mind that every theme requires some configuration. Also, not every theme works the same way. Some utilize a basic text editor (which looks similar to the blank page in Microsoft Word) while others use a page builder or visual editor. So, switching from one theme to another will force you to do a little rework if or when you make a switch. If you want to spare yourself the possible hassle, then don’t move on to the next steps until you’ve found the perfect WordPress theme for your site.
Step 5: Install Your WordPress Theme
When you find that perfect WordPress theme, it’s time install it in WordPress.
Free WordPress Themes
If you’re using a free theme from the WordPress repository, here is what you need to do:
Inside WordPress, go to the Appearance tab and click on “Themes”.

Go to Appearance – Themes.
At the top of the page, click on “Add New”. This will take you to the WordPress repository from within WordPress. Use this option so you don’t have to do any manual installation.
Once you’re in the repository, do a search for the WordPress theme you want to use. Hover over it, and click the “Install” button.

Select a theme and click Install.
When it’s done installing, you then have to activate it in order to publish it to your WordPress site. Click on “Activate” (in the same spot where the “Install” button was) and wait for it to take you back into the main WordPress dashboard.
Premium WordPress Themes
If you’ve decided to purchase a premium WordPress theme, the process will differ as third-party theme developers and marketplaces don’t sync directly to WordPress. Here is what you need to do:
Go to your WordPress theme’s page and purchase the file. Once you’ve done this, you’ll be taken to a screen where you can download the theme file. It will look something like this:

You can find many premium WordPress themes on popular theme marketplaces.
If there is an option for it, download the “Installable WordPress Files Only”. This will give you a zipped folder you can then upload directly into WordPress.
To do this, go back into WordPress, find the Appearance tab, and go to “Themes”. Click on “Add New” at the top. Only, this time, you’ll select the “Upload Theme” option.

Click the Upload Theme button.
Select the zip file from your computer and click Install Now. With your new theme uploaded into WordPress, you can now activate and publish it to the site.
Step 6: Configure Your WordPress Theme
Upon activation, you’ll want to spend some time configuring your theme. You can do this under the Appearance tab and then click “Customize”.

Click on Customize to open the WordPress theme customizer.
Ultimately, it’s up to you to decide how much or little of your theme you want to customize. However, you should at least take some time now to go through each of the modules and acquaint yourself with what you have the power to change.

WordPress Theme Customizer.
Site Identity is an important one to fill in, so make sure you look at that first.
Colors allows to update your site to your brand’s color palette (if you have one).
Widgets allows you to add content to your footer.
And Menus refers to your site’s navigation–something I’m going to cover in Step 8 so there’s nothing to do here just yet.
Step 7: Publish Your First Pages
There are two types of “pages” you can create for your website:
1. Page

WordPress Pages screen.
These are traditional web pages that exist within the main navigation of a site. The About page, Contact page, and individual services pages all are made using the Page feature in WordPress.
2. Post

WordPress Posts screen.
These are blog post “pages” that will only exist within the blog on your website, unless you designate the home page to serve as the blog feed (I’ll talk about that in Step 9).
Now, the great thing about WordPress is that the interface is consistent regardless of whether you’re creating a page or a post. There are different settings you need to apply to each, but the main area in which you work remains the same, which makes it a workspace that’s easy to get used to.

WordPress Edit Post screen.
Of course, if you work in a theme that uses a page builder or a visual builder tool to create content, this is going to look a little different.
A page builder tool allows you to create “blocks” of content for your site within WordPress. Once the blocks are in place, you can then populate them with corresponding content.
A visual builder tool works similarly in that it allows you to create blocks of content for your site–however, it does it on the front end of the actual site so you can see your changes in real time. There are plenty of drag and drop page builders out there, but here are some of our favorites.
Regardless of which content creation tool your WordPress theme uses, it’s time to create content for your site.
If you’re running a blog, simply get started writing your first Posts. Once you hit the Publish button, your blogs will go live on the designated Blog page.
For a traditional website, you’ll probably want to build out the following pages:
- Homepage
- About page
- Services or products page(s)
- Contact page
As your website grows, you can create other pages. For now, those will suffice. Get some content on them, publish the pages, and then let’s work on getting them onto your website.
Step 8: Create a Menu
Whereas when you hit the “Publish” button on a Post and it goes straight onto your blog, a Page needs to be added to your site’s navigation (or menu) if you want it to show up.
So, the first thing to do is to create those pages for your site (which you did in Step 7).
Next, you’ll want to go to the Appearance tab and select “Menus”. This is where you will build and manage your site’s navigation.

Select Menus from the WordPress Appearance menu.
There is kind of a lot going on here, so let’s take this one step at a time.
First, let’s look at the menu selection dropdown.

WordPress Menus screen.
Unless you have a need for a mega menu or multiple menu options on your site, you likely won’t even have a choice here. However, if your theme automatically creates secondary or footer menus for you, be sure to select the one you actually want to create/edit here.
Next, let’s look at the sidebar options.

Add links to posts, pages, custom post types, other taxonomies, and external URLs to your menu.
When you expand these tabs, you’ll be presented with pages, posts, and other types of content that already exist on your site (which is why you need to at least start on Step 7 before doing this step). For the most part, you’ll be working within the Pages tab to create your menus. However, if you do have custom links or other content types you want to add to the navigation, know that this tool allows you to make that happen.
Now, it’s time to create your menu.
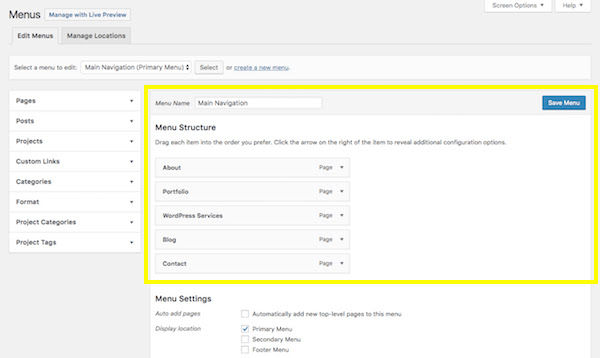
WordPress lets you create different menus to use in your chosen theme.
In order to get pages to show up under the Menu Structure section, click the checkbox next to the page (or pages) you want to add to the sidebar. Then click on the “Add to Menu” button. You’ll see those pages then show up under Menu Structure.
Within this interface, you can now drag-and-drop your pages and design your menu to appear however you’d like it to. In addition to placing pages in a custom order, you can also create a hierarchy. So, let’s say you wanted “Portfolio” to appear only when someone hovers over the About tab, simply drag that page inward so that it becomes a subitem:

Create nested menus.
You can also change the page labels that appear in the navigation. For instance, let’s say you called the page “Portfolio” in WordPress so your employees would know where to put examples of your work. However, on the customer-facing side of the website, you think it would be clearer if you called the page “Sample Work”. You can rename it here.

Change menu navigation labels.
One other thing to point out here is the Menu Settings box at the bottom.

Menu Settings section.
If you know that you’ll be adding new pages regularly to your website and don’t want to have to repeat this process every time, you can click on the “Automatically add new top-level pages to this menu” option to streamline your process.
When you’re done setting up your menu, save your changes.
Step 9: Configure Your WordPress Settings
I typically advise new WordPress users to leave the settings setup until this stage of the process. Many of the settings offered by WordPress control things related to your pages and posts, and that’s not necessarily something you’d understand until you’ve actually created them for your site.
So, now that you’ve done that, it’s time to go through your settings one-by-one and make sure your WordPress site is configured to work exactly as you want it to.
General

General Settings screen.
- Site Title: This is what will appear in someone’s browser tab when they arrive at your site.
- Tagline: This can be changed when you create content for your home page, so this isn’t a required field.
- WordPress Address: This is the URL of your main site.
- Site Address: For most of you, this will match the WordPress Address. However, if you are setting up something like Multisite that requires each site have its own sub-domain, you’ll specify that here.
- Email Address: This is for the main admin of your site, so they can receive all related notifications regarding it.
- Membership: If you want people to subscribe to your site for updates, click this box.
- New User Default Role: Keep this to Subscriber or Customer so that they can’t gain access to the backend of your site.
The rest of the information pertains to date and time configurations.
Writing

Writing Settings screen.
- Default Post Category: If you’re including a blog on your site, you should eventually come in here and remove the “Uncategorized” category. You’ll want each new post to be assigned a category and removing the default setting will make it easier on yourself in the future.
- Default Post Format: For the most part, “Standard” should suffice unless you’re using your blog to share video, audio, or image galleries.
- Post via email: If you want to be able to write WordPress posts and email them to your site (which I wouldn’t advise), you can enable this setting here.
- Update Services: Leave this field be unless you have a private blog and don’t want people to know when you have new content available.
Reading

Reading Settings screen.
- Your homepage displays: You have two choices when setting up a site in WordPress. You can let your homepage serve as the main blog roll, so that visitors first encounter “Your latest posts”. Or you can create a full-blown website and let “A static page” you created serve as the home page.
- A static page: If you select this second option, you’ll need to designate a page to be your homepage and a page to automatically display your posts on.
- Blog pages show at most: If you show a summary of your blog posts (see option below), you can display up to 10 posts per page. If you show the full text, try to limit this to 3 posts.
- Syndication feeds show the most recent: When your blog shows up in someone’s RSS (syndication) feed, this setting enables you to choose how many recent posts they’ll see initially.
- For each article in a feed, show: This is up to you to decide, though I think a summary is probably best for improving the overall look on a main blog page’s feed. It also gives visitors a reason to click through and visit another page (which is good for SEO).
- Search engine visibility: Unless your website is private, do not check this box.
Discussion

Discussion Settings screen.
- Default article settings: The first setting refers to backlink notifications. The second setting refers to pingbacks and trackbacks. The third has to do with allowing comments on your blog.
- Other comment settings: If you do want visitors to leave comments, you can set requirements on who they are as well as how comments appear.
- Email me whenever: Staying engaged with people who take the time to comment on your content is a good thing. Check these so you can more easily stay on top of that.
- Before a comment appears: If you’re worried about spam or abusive comments coming through, update these settings.
- Comment Moderation/Blacklist: You can decide more specifically who is allowed to leave a comment (so long as it’s moderated) and who isn’t.
- Avatars: If you’re not running a membership site that allows users to create a full custom profile, be sure to update these settings to give your comments section a little personality.
Media

Media Settings screen.
If you’ve designed a custom WordPress site, you may have a need for custom media file sizes. In using this setting, you can streamline the media upload and sizing process. That way, visual content automatically goes into your pages at the right size and you don’t have to worry about making adjustments of it in your design software or compromising visibility of the image once it’s in WordPress.
Step 10: Install Essential WordPress Plugins
Installing WordPress plugins is the final step in the WordPress setup process.
In terms of what a WordPress plugin is, it’s a piece of software that hooks into WordPress. As for what it does? Well, plugins can do a lot of different things. They can help you:
- Integrate a social media feed into your site.
- Resize and compress images.
- Block spammers and hackers.
- Create a forum.
- Add a payment gateway.
- Translate your site.
- And much, much more.
So, how do you choose which ones you need?

The WordPress.org plugin directory provides users with thousands of free plugins.
While it’s tempting to look through the WordPress repository that currently houses over 50,000 free plugins and install all of the ones that seem really cool or worthwhile, be careful. WordPress plugins are like any other kind of file or software you layer on top of your site. With more weight, comes slower loading times–and that’s not something you want for your user experience.
That’s why you need to choose your plugins wisely. To start, let’s look at the absolute plugin essentials every WordPress site needs:
- Google Analytics plugins: Tracking visitor activity on your WordPress site is essential. However, getting the Google Analytics tracking pixel on your site isn’t always that straight-forward. These plugins will take care of it.
- SEO plugins: These plugins are great as they provide guidance on what you need to do on each page or post to optimize it for search.
- Caching (speed) plugins: People don’t have much patience anymore and you don’t want your site to test that, so you’ll need one of these plugins.
- Image optimization plugins: Every website uses images, whether they’re your own high-resolution photography or really cool stock photos and illustrations you found on the web. If you want to keep them looking sharp and loading fast, you need one of these.
- Security plugins: With WordPress being so popular around the world, it’s often a common target for hackers. A security plugin will help you create a stronger defense against them.
- Contact form plugins: If you’re publishing a site to the web, then you most definitely want people to not only visit it, but to engage with you through it. A contact form is an essential piece required for that interaction to take place.
- CRM plugins: Find out everything you need to know about your website visitors. For example, with HubSpot’s WordPress Plugin, you can see all the pages someone has visited, live chat with your visitors while they are browsing your website, and send them marketing emails — and all of that for free.
As for getting these plugins onto your site, well, that’s the easy part.
If you’re installing WordPress as a WPMU DEV Member, we automatically install the WPMU DEV Dashboard plugin onto your site.
This not only gives you access to your membership and our 24/7 support, it also allows you to easily set up our entire suite of plugins (covering most of the essential plugin categories listed above) with just one click.
For example:
- Google Analytics plugins: Beehive Pro (install the free Beehive plugin if you’re not a member).
- SEO plugins: SmartCrawl Pro (or get the free SmartCrawl SEO plugin if not a member).
- Caching (speed) plugins: Hummingbird Pro (or get Hummingbird free if not a member).
- Image optimization plugins: Smush Pro (or get Smush free if not a member).
- Security plugins: Defender Pro (or get free Defender security if not a member).
- Contact form plugins: Forminator Pro (or get Forminator free if not a member)
- Email Marketing/Opt-in plugins: Hustle Pro (or get Hustle free if not a member)
- Automated site backups: Snapshot Pro (WPMU DEV members only)
- And more.
If installing other plugins, the process is almost identical to WordPress theme installation.
Inside WordPress, go to the Plugins tab on the left and select Add New. This will take you to the WordPress repository without forcing you to leave your site.

Go to Plugins – Add New.
Once inside, you can do a search on the right for the plugin you want to install. You’ll have to do this process one-by-one for each of your plugins.
Next to the plugin name, you’ll see an “Install Now” button. Click it.

Click on Install Now.
This will install the plugin. Next, click on Activate.

Click on the Activate button.
The plugin is now activated.

WordPress lets you know the plugin has been activated.
Some plugins will require some configuration before you can use them and will automatically redirect you to their settings page to do so. Other plugins are ready to go out of the box. Regardless of which kind of plugin you’ve just installed, you’ll be able to find it here under “Installed Plugins”:

View all the plugins installed on your site in the Plugins screen.
Plugins in blue are currently activated. Plugins in white are not inactive. To activate a plugin, click the “Activate” button below it. To “Deactivate” or “Delete”, do the same. And, for plugins that have settings you can configure, you can click that button if it’s available.
It’s also important to note that some of your plugins will generate their own new tab on the sidebar. Take WP Smush, for instance. If you’ve chosen to use this image optimization plugin, you’ll now find that it’s installed a new option on your sidebar:

Installing new plugin on your site can also add new menu entries to the admin menu.
So, be sure to look out for those new tabs after activation as they hold valuable settings and features you’ll want to start accessing right away.
Wrapping Up
WordPress is the undisputed champ of content management systems, which is why there’s never been a better time to learn how to use it. In just 10 steps (and some careful research and planning), you can get your first WordPress website up and running! Good luck!
------------------------------------------------------------------------
Managed Dedicated Server Low cost
Goolhost.com


