


How to Move Live WordPress Site to Localhost?
There are applications like MAMP and WAMP used to create a local server environment. This helps to install packages like WordPress so that developers and site owners can build their site in local PC or Mac. Once the local site is ready, it can be easily moved to the live server. But over the period of time your live site may have lot of deviations compared to the localhost site.
At this point you may want to sync the live site’s content to local site so that you can test plugins / themes/ WordPress version updates on a local site before updating on a live site. Though there are plugins which can speedup the backup process, in this article we explain how to manually move live WordPress site to localhost environment. If you are looking for setting up local WordPress site then read our separate article on how to install WordPress on your Mac using MAMP.
Move Live WordPress Site to Localhost
Before we go to the detailed process here is a summary of the entire process for moving your live site to localhost environment:
- Use FTP client and download all your live WordPress site files, generally available under “/public_html” folder.
- Login to your hosting account and export live site’s database from phpMyAdmin section.
- Login to phpMyAdmin of your localhost using the application you used to install WordPress locally and create a new database.
- Import live database file downloaded in step 2 to localhost server.
- Run query to replace all occurrences of live site’s URL with the localhost URL.
- Replace localhost site’s files with the live site’s files from step 1.
- Edit “wp-config.php” file and change the database name to new database name as created in step 3.
- View localhost site and login to localhost WordPress admin dashboard to see all live site’s content is available.
You can setup localhost WordPress site using port 80 or 8080. If you use 80, the URL will be http://localhost and for 8080 the URL will be http://localhost::8080. In this article, we will explain using port 80, if you use 8080 remember to use the correct local site URL.
Step 1 – Download Live WordPress Site Files
Launch FTP client like FileZilla, connect to your hosting server and download all WordPress files of a live site to local computer. Generally files will be available under “/public_html” folder unless you changed it to another directory during WordPress installation. The entire download may take a while based on the size of your site. Hence we recommend to do this step first so that you can do further steps in parallel.
In FileZilla first choose local site’s location where you want save the files. Under remote site section, select the files and choose “Download” option by right clicking. This will download all selected files to your local computer.

Download WordPress Site Files Using FTP
If you are looking for FileZilla tutorials, read our article on how to configure FileZilla, setting up FTP account in Bluehost and connect FileZilla to Bluehost FTP server account.
Step 2 – Exporting Live WordPress Site’s Database
The next step is to download the SQL database file of your live site. Login to your hosting account and go to the cPanel. Click on the phpMyAdmin icon and login to your phpMyAdmin section. Note that some hosting companies like SiteGround offer custom solutions instead of cPanel. You should be able find phpMyAdmin as it is a standard database management tool. Select the correct database and click on the “Export” option.

Exporting MySQL Database in WordPress
- Choose “Custom – display all possible options” as “Export Method”.
- Select all database tables (you can ignore the tables which you don’t want to export by deselecting them).
- Select output compression as “zipped” or “gzipped”.
- Choose format as “SQL”.

Select Database Format and Output for Exporting
Click on “Go” button at the bottom to download the SQL database file in a compressed format to your local computer.
Note: We recommend export the database by ignoring security and caching plugin tables. These plugins may cause problems while uploading it in the local environment. In most cases, these types of plugins are not required in local environment or you can export the plugin settings from live site and import it on your local site after reinstalling the plugins.
Step 3 – Creating a New Local Database
Similar to step 2, login to phpMyAdmin section of your localhost with the URL “http://localhost/phpmyadmin/” and create a new database with the same name as live site’s database.

Create Database for Local WordPress Site
Step 4 – Importing Live Database to Local Site
Now select the newly created database and then click on the “Import” option. Choose the live site’s database downloaded in step 2 and upload to local server.
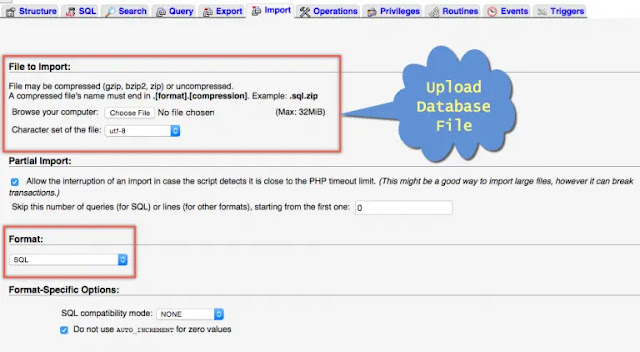
Import Live Database in Local Server
The import will work when you have smaller database size. If your live database is bigger than 32MB in size (or as limited by maximum file upload size on your site) then importing zip file from phpMyAdmin will fail. In such case, you may need to upload the database from command line. You can follow the instructions in this article on how to import large SQL database for MAMP in Mac.
Step 5 – Replace Live Site URL with Local Site URL in Tables
Now that you have uploaded live site’s database to local server but the tables will still have live site’s URL references instead of localhost which you need to change it. Copy the below query and replace the site name with your own URL.
UPDATE wp_options SET option_value = replace(option_value, 'https://www.yoursitename.com', 'http://localhost') WHERE option_name = 'home' OR option_name = 'siteurl'; UPDATE wp_posts SET post_content = replace(post_content, 'https://www.yoursitename.com', 'http://localhost'); UPDATE wp_postmeta SET meta_value = replace(meta_value,'https://www.yoursitename.com','http://localhost');
Go to the phpMyAdmin section of your localhost site and select the database. Click on the “SQL” tab and paste the query in the box.

Replace Live Site URL with Localhost URL in phpMyAdmin
If you see the “Simulate query” button, click on it to see whether the query will replace the URLs. Sometime you will not see the “Simulate query” button. Just click on “Go” button to run the query to replace live site URL with localhost URL. Remember to note the following points:
- Ensure to use HTTPS, if your live site URL is SSL protected.
- Localhost URL should always be with HTTP.
- WordPress tables generally starts with “wp_” prefix. But if you have changed with other prefixes, then replace the table names in the query as per your prefix.
You will see the result indicating how many lines are changed in the tables after the successful execution of the query.

View Result of the Query
Step 6 – Replace Local Site Files with Live Site Files
Next step is to replace local site’s files with the live site’s files downloaded in step 1. The simple way to avoid mistakes here is to change the existing local folder name with the suffix “_old” and then create a new folder with the same name. Paste all live site’s files inside the new folder.

Replacing Localhost Files with Live Site Files
Step 7 – Configuring Database Name in wp-config.php File
If you open your localhost site now it will probably show the message “Error establishing database connection”. Locate and open “wp-config.php” file in local server and replace the database name with the correct name as you created in step 3. Generally the username and password are same as “root” (unless you changed it) and change it accordingly.

Modify wp-config php File
Step 8 – Check Your Localhost Site
Login to localhost WordPress admin dashboard and check the settings.
- The sidebar widgets will not be imported from the live site. So you should manually add the sidebar widgets in localhost site.
- Plugins having single domain license key may not work on the local site as it is validated with the live site.
- Some of the plugins like caching and security plugins may not work in local environment. Either they will be automatically deactivated or you should manually deactivate for the localhost site to work properly.
- If you have the absolute URLs used on footer and menu items then you may need to manually change them to local site URLs.
Conclusion
We hope the article helped you to move your live WordPress site to localhost. As mentioned, we recommend to ignore the caching and security plugins and related tables when exporting the live content. In addition, the page builder and licensed plugins may also stop working on the local environment. You can also try other options like using staging site if you are using siteGround or Local By Flywheel.
------------------------------------------------------------------------


